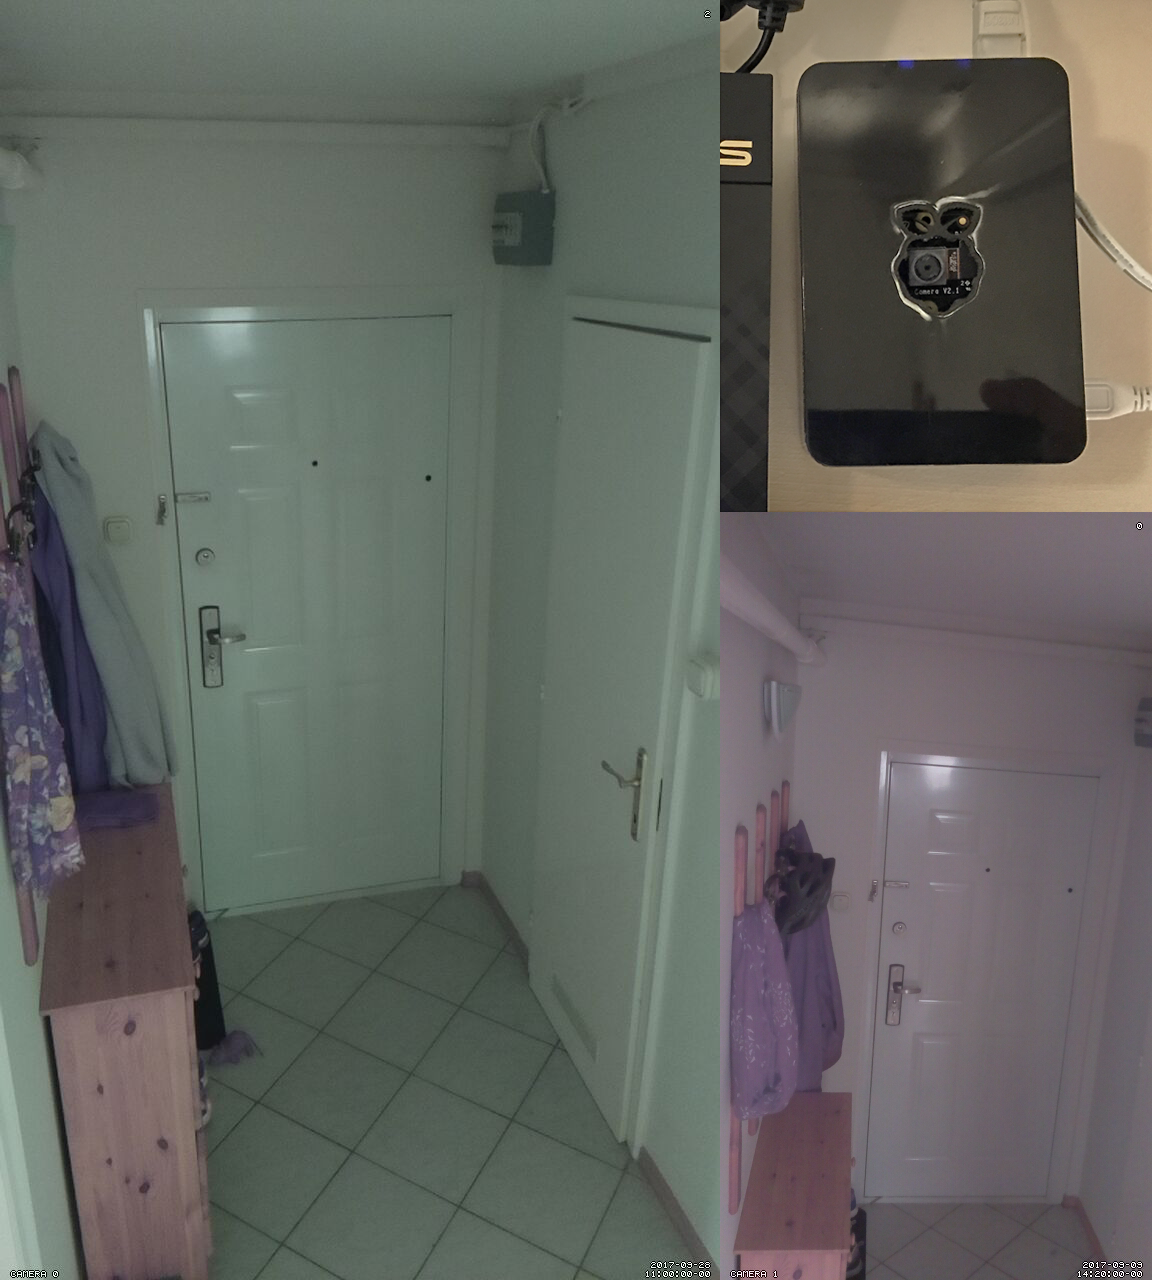
DIY home security
This is a note about replacing the old security system I made to monitor our front door. I am trying to achieve better image quality and higher frame rates.
The base concept is that a Raspberry Pi watches the front door and uploads as many picture to Dropbox as it can if there is significant motion. The Pi only sends me notifications when it is activated by our phones.
Ingredients:
- Raspberry Pi 3
- Raspberry Pi NoIR Camera v2
- Official RasPi 3 Power Supply
- 16GB SD card (class 10)
- Computer with SD card reader
- Ethernet cable
- Cheap plastic RasPi case
Install Raspbian headless
It is possible to install Raspbian headless, but only with Linux. On Windows or MacOS I recommend to install it with NOOBS and configure with a monitor.
Download the official Raspbian lite image and install with an image writing tool. Etcher is a simple graphical tool, but dd is not much more complicated either.
Insert the SD card, and use df -h to find out the device name, it is like /dev/something. Unmount it using umount /dev/something to prevent unwanted reads and writes during the operation. If the card doesn't show up with df -h then use sudo fdisk -l to find out the name.
Unzip the image:
unzip /path/to/raspbian/image.zip
Write the image to the card:
sudo dd bs=4M if=/path/to/raspbian/image.img of=/dev/something status=progress
Run sync to write out data buffered in memory and remove the SD card.
Reattach the SD card and run df -h to find the partitions installed.
SSH
To enable ssh create an empty file called "ssh" in the root directory of the BOOT partition.
Generate your rsa key pair:
ssh-keygen -t rsa
Add to the end of /home/pi/.ssh/authorized_keys on the ext4 partition:
mkdir -p /path/to/ext4/home/pi/.ssh
cat ~/.ssh/id_rsa.pub >> /path/to/ext4/home/pi/.ssh/authorized_keys
Set static IP
Set static ip by adding the following lines to /etc/dhcpcd.conf on the ext4 partition:
interface eth0 // or your interface name
static ip_address=192.168.0.10/32
static routers=192.168.0.1
static domain_name_servers=192.168.0.1
Run sync to write out data buffered in memory and remove the SD card.
Assemble and continue through SSH
Assemble the Pi, first connect the network cable and then power up.
Log in using the default password raspberry or entering your passphrase:
ssh [email protected]
Change the default password:
passwd
Basic configuration
Raspi-config
sudo raspi-config
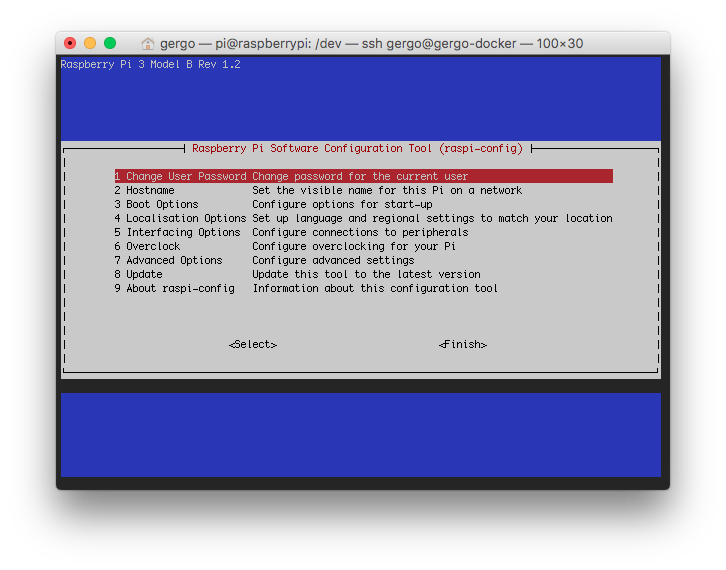
Enable the camera: Interfacing Options -> Camera
Set the correct timezone: Localisation Options -> Change Timezone
Add video0 device
Update the firmware to make sure the v4L2 drive is available.
sudo rpi-update and sudo reboot
Load and create /dev/video0 device:
sudo modprobe bcm2835-v4l2
To load at boot time add the following line to the end of /etc/modules:
bcm2835-v4l2
Reboot and check:
sudo reboot
Upgrade
Upgrade packages before installing anything.
sudo apt update
sudo apt full-upgrade
Install git
sudo apt install git
Extend the life of the SD card
With noatime fstab attribute Raspbian doesn't record information about when files were created, last modified and last accessed, but regular write operations still shorten the life of the SD card.
Using tmpfs it is possible to mount a directory into RAM as it was an ordinary filesystem. We don't need much space, as the pictures will be deleted after having been uploaded to Dropbox.
Add an entry to /etc/fstab:
tmpfs /var/lib/motion tmpfs defaults,noatime,nosuid,mode=0775,size=100m,uid=109,gid=1000 0 0
Root is the default owner of directories mounted by fstab. Adding uid=109, gid=1000 and mode=0775 motion and pi will be able to read, write and execute in the folder.
Reboot and check:
sudo reboot
Send mail
After creating a gmail account go to My account -> Sign-in & security. Scroll down and turn ON Allow less secure apps
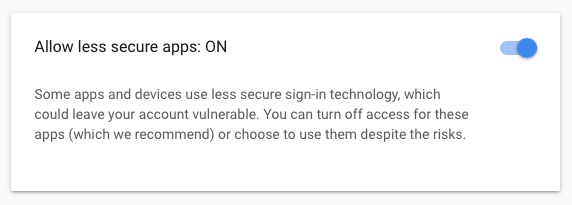
Back to raspberry install mailing apps:
sudo apt-get install ssmtp mailutils mpack
Edit /etc/ssmtp/ssmtp.conf:
root=postmaster
hostname=raspberrypi
mailhub=smtp.gmail.com:587
[email protected]
AuthPass=gmailPassword
useSTARTTLS=YES
FromLineOverride=YES
Try to send an e-mail:
echo test | mail -s "This is the subject line" [email protected]
Dropbox uploader
After creating a dropbox account visit https://www.dropbox.com/developers
Go to My apps, press Create app button and then select Dropbox API, App Folder, name your app and press Create app.
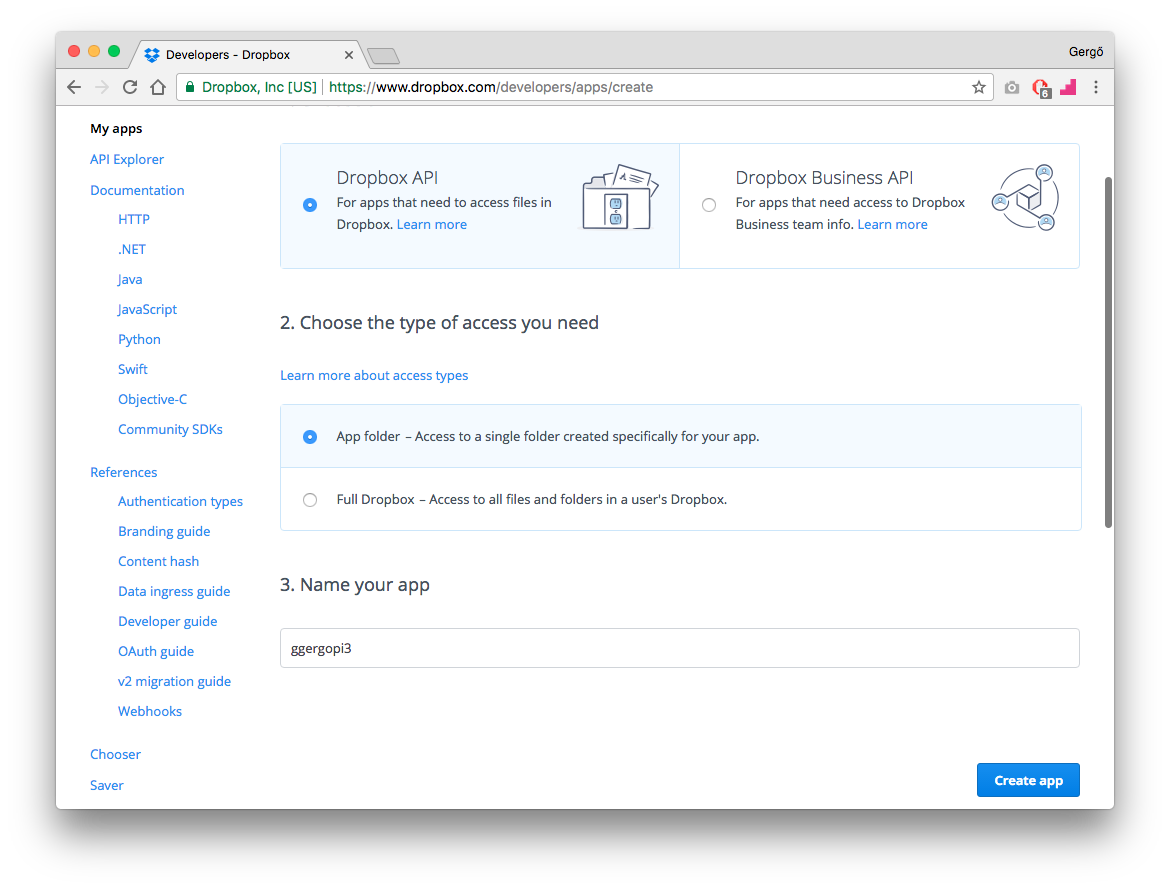
Clone Andrea Fabrizi's Dropbox Uploader from github:
git clone https://github.com/andreafabrizi/Dropbox-Uploader.git
Run without parameters for the first time to configure:
path/to/Dropbox-Uploader/dropbox_uploader.sh
The Generate button is at the OAuth 2 segment.
The first upload will create the App folder:
echo 1 > test.txt and path/to/Dropbox-Uploader/dropbox_uploader.sh upload /path/to/test.txt appFolder/test.txt
By default your oauth access token will be placed to ~/.dropbox_uploader. However you can use a different file with the -f parameter if you need to.
Install motion
With raspberry 2 I was not able to successfully install the official motion from the repo either with wheezy or jessie but this time:
sudo apt-get install motion
Enable daemon mode
Change in /etc/motion/motion.conf:
daemon on
Change in /etc/default/motion:
start_motion_daemon=yes
Enable motion service:
sudo systemctl enable motion
On motion start
I created a simple bash script to run on motion start event.
on_motion_start.sh
#!/bin/bash

status=`cat /var/www/html/notify`

if [ "$status" != "0" ]; then
    echo 'Movement at the front door' | mail -u pi -s "Security alert" [email protected]
fi
Make motion the owner:
sudo chown motion path/to/on_motion_start.sh
On picture save
I created a simple bash script to run on picture save event.
on_picture_save.sh
#!/bin/bash

/path/to/Dropbox-Uploader/dropbox_uploader.sh -f /home/pi/.dropbox_uploader upload $1 $2
rm $1
sudo chown pi:motion /home/pi/.dropbox_uploader
sudo chmod 640 /home/pi/.dropbox_uploader
Archive previous days
Dropbox preserves deleted files for 30 days. This is more than enough for me.
Create an archive script:
/home/pi/on_archive.sh
#!/bin/bash

DATE=`date --date='-2 day' +%Y/%m/%d`

/home/pi/Dropbox-Uploader/dropbox_uploader.sh -f /home/pi/.dropbox_uploader delete /motion/$DATE
chmod 755 /home/pi/on_archive.sh
Add to crontab with crontab -e:
37 7,18 * * * /home/pi/on_archive.sh
Configure motion
Open /etc/motion/motion.conf
# Comment out logs
#logfile /run/shm/motion.log

rotate 270
width 1280
height 720
framerate 3

threshold 10000
lightswitch 100

minimum_motion_frames 2

pre_capture 5
post_capture 5

output_secondary_pictures off

quality 80

# For debugging light changes
locate_motion_mode on
locate_motion_style redbox

text_right %Y-%m-%d\n%T-%q
text_left CAMERA %t
text_changes on

target_dir /var/lib/motion
snapshot_filename %Y-%m-%d-%H-%M-%S-%q-snapshot
picture_filename %Y-%m-%d-%H-%M-%S-%q-motion

on_event_start path/to/on_motion_start.sh
on_picture_save path/to/on_picture_save.sh %f 'motion/%Y/%m/%d/%H-%M-%S-%q.jpg'
We will add a mask file later.
Create a two way switch
Install nginx and fastCGI PHP
Install nginx:
sudo apt install nginx
Install PHP fastCGI process manager:
sudo apt install php7.0-fpm
Edit /etc/nginx/sites-enabled/default:
location ~ \.php$ {
    include snippets/fastcgi-php.conf;

    # With php-fpm (or other unix sockets):
    fastcgi_pass unix:/var/run/php/php7.0-fpm.sock;
}
Test nginx configuration:
sudo nginx -t
Reload nginx with the new config:
sudo systemctl reload nginx.service
Secure php
Edit /etc/php/7.0/fpm/php.ini:
cgi.fix_pathinfo=0
Restart php:
sudo systemctl restart php7.0-fpm
Write some basic PHP and HTML code
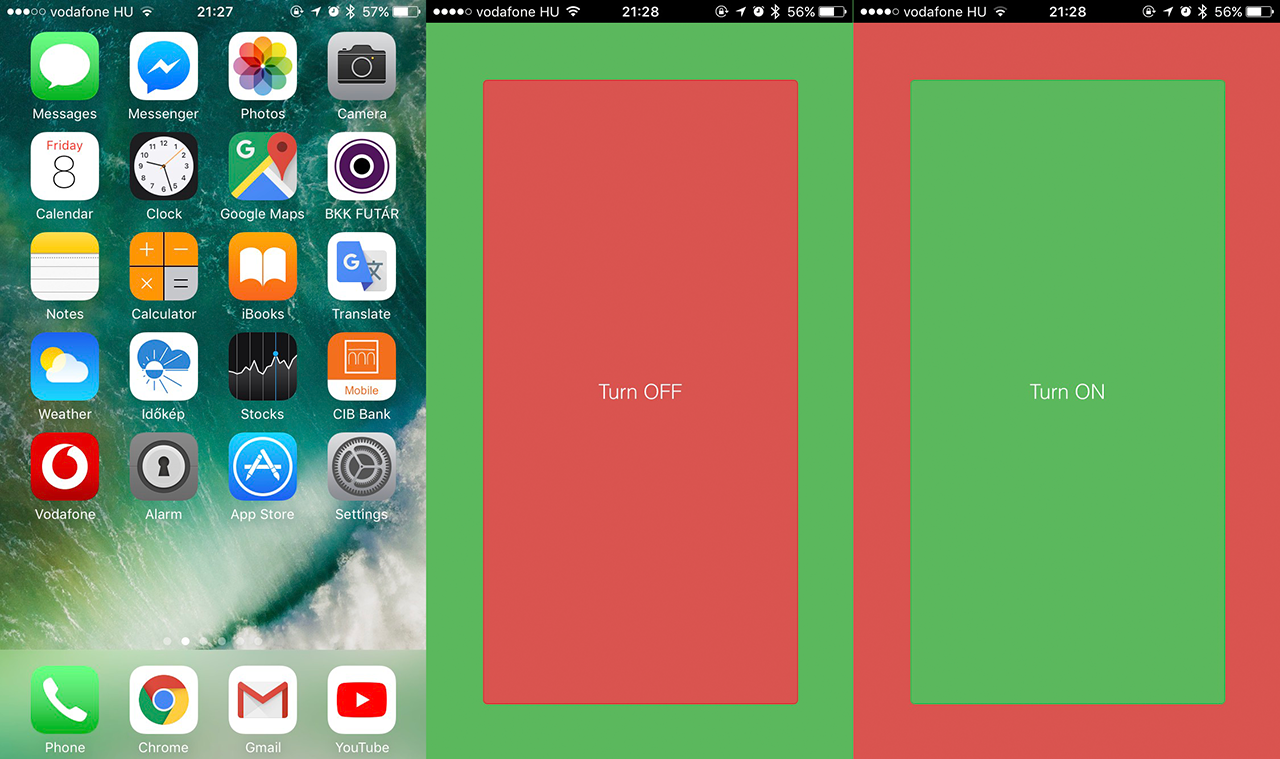
Create the simple php file.
/var/www/html/index.php
<?php
    header("Cache-Control: no-store, must-revalidate, max-age=0");
    header("Pragma: no-cache");
    header("Expires: Sat, 26 Jul 1997 05:00:00 GMT");

    $notify = fopen("/var/www/html/switch", "r+") or die("Unable to open file!");

    if (isset($_POST['status'])) {
        fwrite($notify, $_POST['status'] === "0" ? 0 : 1);
        fclose($notify);

        header("Location: /index.php");
        exit();
    }

    $status = rtrim(fgets($notify), "\r\n") === "0" ? "off" : "on";
    fclose($notify);
?>
<html>
    <head>
        <meta charset="utf-8">
        <meta content="width=device-width,initial-scale=1" name="viewport">
        <link rel="stylesheet" type="text/css" href="./button.css">
        <link rel="apple-touch-icon" sizes="180x180" href="icon.png">
        <meta name="apple-mobile-web-app-capable" content="yes">
        <meta name="apple-mobile-web-app-title" content="Alarm">
    </head>
    <body class="<?php echo $status; ?>">
        <form id="form-id" method="post">
            <input type="hidden" name="status" value="<?php echo $status == 'on' ? 0 : 1; ?>" />
            <div class="button" onclick="document.getElementById('form-id').submit();"></div>
        </form>
    </body>
</html>
Create the CSS file.
/var/www/html/button.css
* {
    user-select: none;
}

html, body {
    height: 100%;
    width: 100%;
    margin: 0;
    padding: 0;
    position: relative;
    font-family: Helvetica, Verdana, Tahoma, sans-serif;
    font-size: 18px;
    font-weight: 300;
    color: #ffffff;
}

form {
    position: absolute;
    top: 50px;
    bottom: 50px;
    left: 50px;
    right: 50px;
    margin: 0;
}

.button {
    height: 100%;
    width: 100%;
    position: relative;
    text-align: center;
    border: 1px solid;
    -webkit-border-radius: 4px;
    -moz-border-radius: 4px;
    border-radius: 4px;
}

.button::after {
    position: absolute;
    top: 50%;
    left: 50%;
    transform: translate(-50%, -50%);
    -webkit-transform: translate(-50%, -50%);
}

.off .button::after {
    content: "Turn ON";
}

.on .button::after {
    content: "Turn OFF";
}

.off {
    height: 100%;
    background-color: #d9534f;
}

.on {
    background-color: #5cb85c;
}

.off .button {
    background-color: #5cb85c;
    border-color: #4cae4c;
}

.on .button {
    background-color: #d9534f;
    border-color: #d43f3a;
}
I was using an icon from dribbble with the permission of the author.
icon.png
Create the switch file:
touch switch
Set permissions:
sudo chown -R pi www-data /var/www/html
sudo chmod 775 /var/www/html/switch
Add to homescreen on iOS
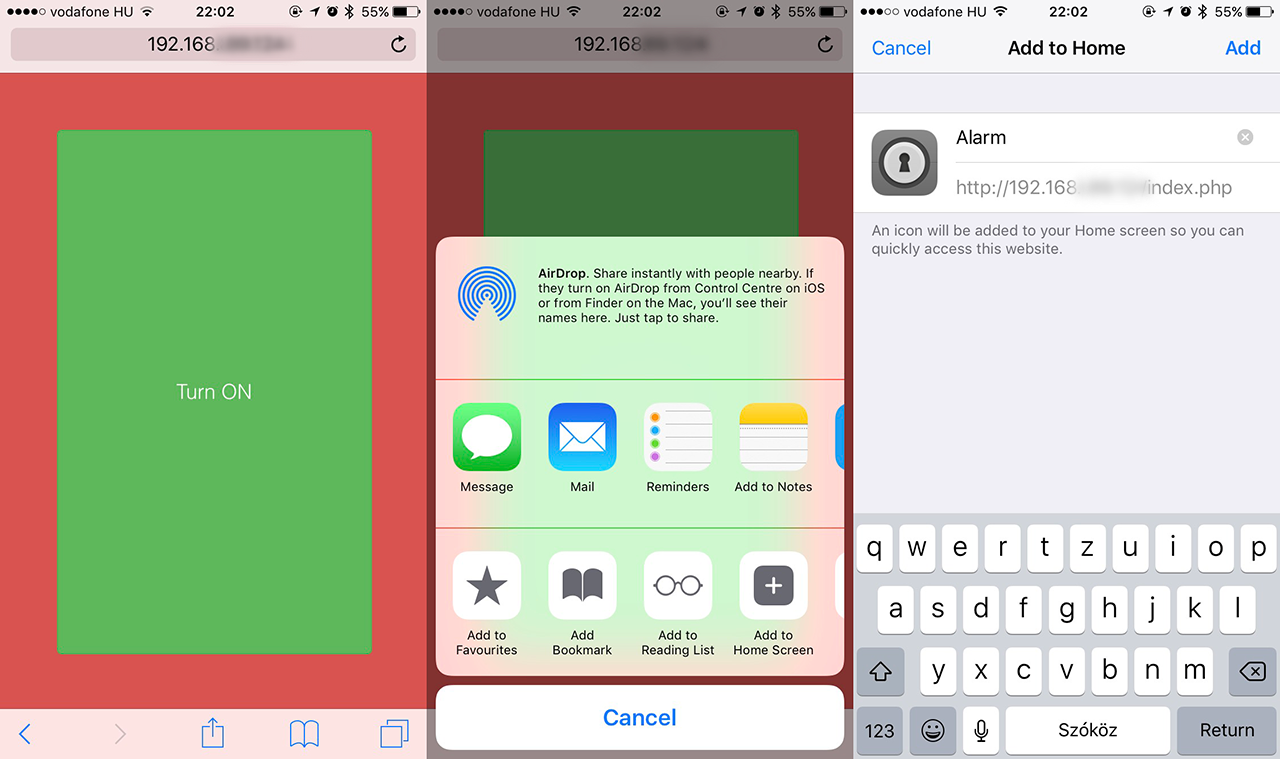
Put the pi and the camera in place
Shut down the pi gracefully:
sudo shutdown -h now
And put it in palce.
Create the mask
I have a cat and the door reflects a window so I had to create a mask to ignore insignificant changes.
Create an image with the exact same size that you get from motion. The base should be white and the areas you want to ignore must be black.
My mask file:

Install djpeg:
sudo apt-get install libjpeg-progs
Convert:
djpeg -grayscale -pnm [inputfile] > /home/pi/mask.pgm
Change motion configuration:
/etc/motion/motion.conf
mask_file /home/pi/mask.pgm
Reload motion and ready to go! :)
sudo systemctl reload motion
Verdict
I am satisfied with the upgrade. Got better image quality but not more frames per second. Dropbox uploader uses a lot of CPU when uploading pictures. 3 frames per second is not a lot but it is more stable now and it is enough for me. About 20 fps is achievable without it.
